The epoxy I use is multipoxy, bought from Polyservice in Nieuwekerk a.d. IJsel. It is well priced, has a nice viscosity and usually enough pot life. For the uninitiated: pot life is the time that you can work with the mixed epoxy before the fluid starts to get thick and to sticky to handle.
When laminating the front beam one of my batches epoxy cured far to quickly, probably because of the rather high temperatures in the attic that is my workspace. To prevent this I now use the biggest paint holders that I can find, mix a maximum of 300 grams epoxy, and I use a second paint holder for cooling. The second paint holder is filled with an icepack and some water, and the paint holder with epoxy is placed on top of this. It keeps the temperature low and slows the curing of the epoxy. Here the paint holder with icepack:


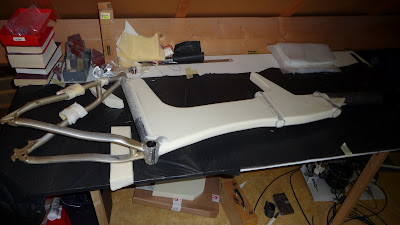
The plug is placed on the table with the right hand side up. Some foam blocks are used to support the frame.
First step after mixing the resin is covering the plug with a layer of epoxy. This makes is easier to fixate the first ply of carbon on the plug. After this the first ply is placed carefully upon the plug.

The large side surface is impregnated with epoxy, and afterwards the material is word around the upper and lower edges of the frame. When the plies are slightly to large the material is cut using normal scissors. Difficult areas may require small cuts into the ply to conform it around bends.

The large side surface is impregnated with epoxy, and afterwards the material is word around the upper and lower edges of the frame. When the plies are slightly to large the material is cut using normal scissors. Difficult areas may require small cuts into the ply to conform it around bends.
 Nitril glooves are used to prevent skin contact with the epoxy. I take several new ones during one session as they tend to get sticky on the outside, this makes the work more difficult.
All epoxy work is done using cheap disposable brushes. large brushes work well for the larger areas, and the 30 mm size is ideal for working the details around the edges.
Andries is working on the head tube area:
Andries is working on the head tube area:
Carefully ply after ply is added to the plug. Between the first and second ply we add a number of local plies in the high stress areas around the bottom bracket and the forward head tube.
A nice view of the frame with me and my lathe on the background:

Before the last ply the area around the bottom bracket is strengthened using carbon fibre roving wrapped around the bottom bracket tube.
The last ply is a diagonally oriented one. The advantage is that this ply does not fray at the long edges. This makes it easier to achieve a nice edge. I intend to leave the carbon visible, so a beautiful laminate is important. In ths laminating session we use about 500 grams of epoxy. Not all will be in the bike, as the bruckes do take quiet some epoxy, and excess epoxy will get into the peelply and breather material.
 After the last ply we cover the frame with a piece of peelply. The peelply is larger than the pieces of laminate. The peelply is cut at the edges to make in form around the edges of the frame as is is much less deformable than the carbon. After this two layers of breather material are added. The breather is smaller to ensure that is only does touch peelply, and never bare epoxy as it is very diffucult to remove breather that is bonded to the cured surface . Any sharp points on the rearframe get a layer of breather as well to prevent a puncture of the vacuum bag.
 After the last ply we cover the frame with a piece of peelply. The peelply is larger than the pieces of laminate. The peelply is cut at the edges to make in form around the edges of the frame as is is much less deformable than the carbon. After this two layers of breather material are added. The breather is smaller to ensure that is only does touch peelply, and never bare epoxy as it is very diffucult to remove breather that is bonded to the cured surface . Any sharp points on the rearframe get a layer of breather as well to prevent a puncture of the vacuum bag.
Making the vacuum bag is a difficult and hasty job, so we have few photographs. We use foil that normaly is used for covering the floor when you paint the house. We start with a piece of foil with a width of 1 m and a length of 5 m. The foil is placed on the floor, and the laminated frame is placed on top of it. With a silicone gun we go along the edges of the foil, making sure we leave no gaps. The uncured silicone will seal the vacuum bag. Then the foil is folded over the frame, and in the rear triangle the foil is tucked in between the frame stays.
Vacuum connections are worked into the silicone between the upper and lower foil, or on the flat foil using a suction cup. Regretfully we put the vacuum hoses into the lower seam. This is not a good idea when you intend to place the frame on a table as we discovered to late.
Vacuum connections are worked into the silicone between the upper and lower foil, or on the flat foil using a suction cup. Regretfully we put the vacuum hoses into the lower seam. This is not a good idea when you intend to place the frame on a table as we discovered to late.

We put on the vacuum and carefully work around the edges of the foil to check for leakages. We work the silicone into any creases in the foil. Slowly the vacuum builds up and we align the frame on the table.
 It is a lot of work to find the last leaks, and as I had to pick up the kids Andries did most of this alone. We end up with a fairly good vacuum bag. A pressure of 0.8 bar below atmospheric, and a pump that runs for about 5 seconds out of every 13. Not perfect, but good enough.


