The procedure is largely identical. This time we need to get the cloth really tight around the edges of the frame, because it is the last layer. After this there is no way to cover up ridges and other mistakes.
At 8 pm we start work. The first session took 5 hours, so we hope to use a bit less time and to be ready at midnight.
This time we make the first 5 layers in all directions 1 cm smaller. The last layer has the normal size. In this way we hope that we get e nice edge on the new laminate.
So first we start out with reducing the size of the template.
After this we cut all layers and stack them on a bourd in the correct order.

And now it is time for the real work. Again Andries works on the front of the frame and I on the rear. The exercise of the first session helps, and we need less effort and less small cuts to get the laminate around the edges of the frame. A trick to avoid fibre pull out on locg strainght edges is to make a few tiny cuts in the edge. This helps to get a cleaner edge on the laminate.


We take a lot of care to avoid lose fibres on top of the existing carbon. For the last layer we also try to avoid this, so we take new brushes and gloves for this layer.
 The team
And again

Adding an extra layer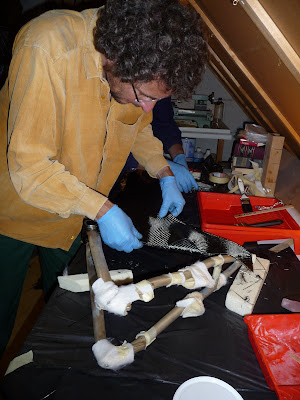
Next job is peelply. This time we put peelply all around the frame, and try to avoid any areas without peelply. Last time the peelply fell off when we tried this, so now we decide to use some extra resin to stick the peelply onto the laminate. This helps a lot. The bleeder will take care of the extra resin anyway, so for the weight it should have no serious impact.
Adding an extra layer


What to do....
 Bleeder on the frame
The last job again is the vacuum bag. And here the problems begin.
Error number 1: I forgot to buy new silicone. I think we have enough, but not plenty.
Error number 2: we start out with kitting the bag before we have measured the lenght properly. The result is that the top side of the bag is to short. Usually I would discard the bag and make a new one, but the lack of silicone forces us to go on with this bag. We patch up the short topside with an extra piece, but this results in a silicone seal that has to go over the frame in stead of along the edge of the bag.
 Sealing the bag
 Lots of silicone
 The difficults parts: joints in the bag
Result: it takes us two hours to get the bag resonably well sealed. The pump maintains around -0.7 bar pressure at a dutycycle of 50 % (10 seconds on, 10 seconds off). This should be good enough. At 1.45 AM we call it a day.
No comments:
Post a Comment